
The first day of snowboarding is not easy.
Most beginners can’t ride as well as they originally anticipated; as it looks much easier when you are watching the Olympians on television, and maybe you can’t even stand up with a snowboard attached to your feet!
Here, I have 9 useful tips for snowboarding to help you overcome the first day challenges and get you boarding like a pro in no time.
Let’s get ready!
Writing this article wouldn’t have been possible if it weren’t for my friend, Takashi Sato(CASI Level 3 Instructor).
目次
- Tips 1 : Find your stance Regular or Goofy
- Tips 2 : Wear the right gear
- Tips 3 : One foot sliding(skating) on a flat
- Tips 4 : One foot sliding on gentle slope
- Tips 5 : How to get off a chairlift
- Tips 6 : Side Slipping
- How to use heel side slipping
- How to do toe side slipping
- Tips 7 : Pendulum(zigzag riding)
- Tips 8 : First turn(C turn)
- Tips 9 : Link turn(S turn)
- Must-Have Accessories: A Snowboarder’s Packing Checklist
Tips 1 : Find your stance Regular or Goofy
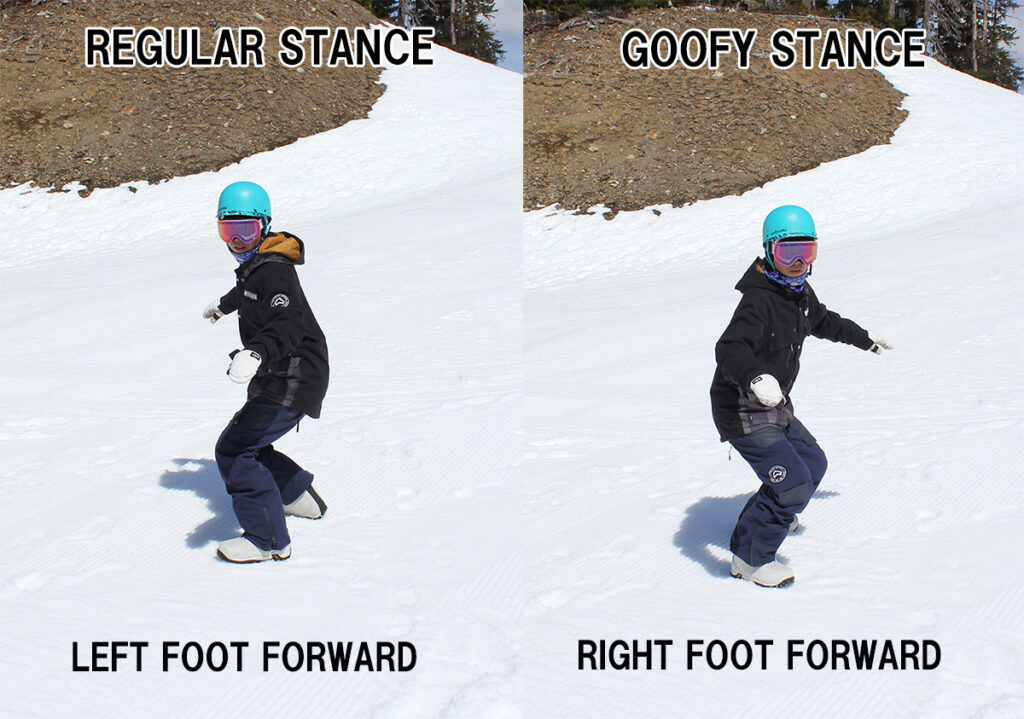
Snowboarding has two stances: regular and goofy.
Find your stance before you start.
A person with a left foot in front has a regular stance.
A person with a right foot in front has a goofy stance. Approximately 70% of people are regular stance, and 30% are goofy stance.
Which is your stance?
If you’re kicking a soccer ball with your right foot, or have your left foot in front when playing golf or baseball batting, there is a high possibility that you prefer regular stance. Another useful way to find out which is your most comfortable stance, is by checking which one-foot skating feels more comfortable than the other. One foot skating is a term we use in snowboarding, which will be elaborated on further down.
For more details, please see the link page below.
https://snowboardtips.net/2021/09/05/how-to-find-your-snowboard-stance-regular-foot-or-goofy/
Tips 2 : Wear the right gear
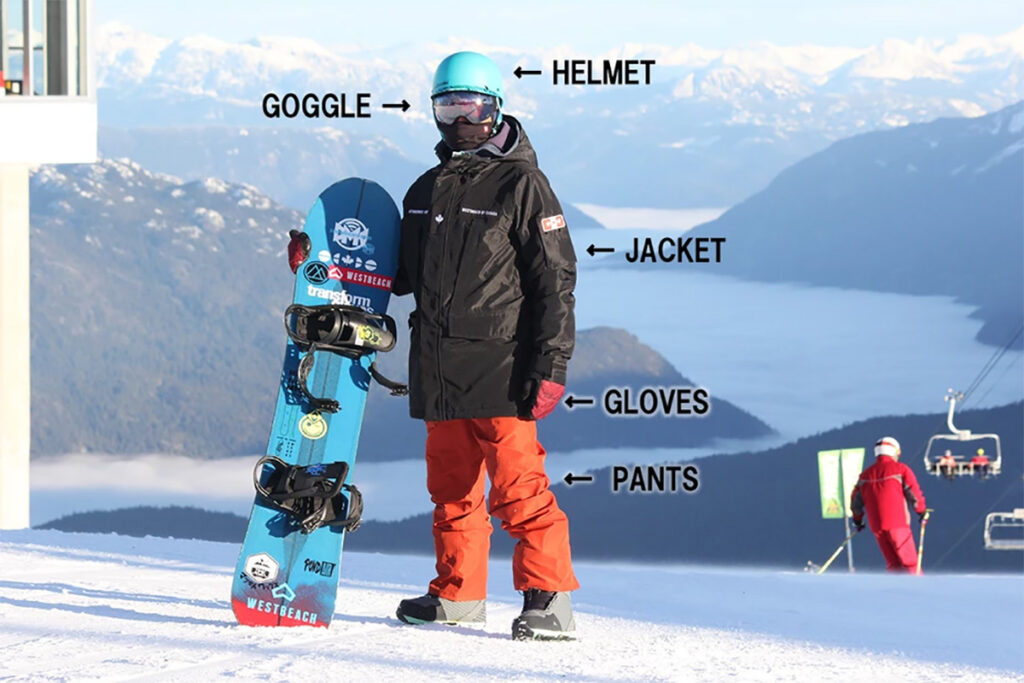
On the snow it is important to wear the right clothing, equipment, and protective gear. This may seem like a no-brainer, but you’d be surprised how many people I’ve seen in the slopes not wearing suitable equipment.
Something to also keep in mind, is that rather than using sun glasses, goggles are highly recommended.
Goggles are more comfortable, supportive, and offer more protection against the harsh conditions of the mountains. Then of course there are the boots and the snowboard itself, make sure you know which style suits you best.
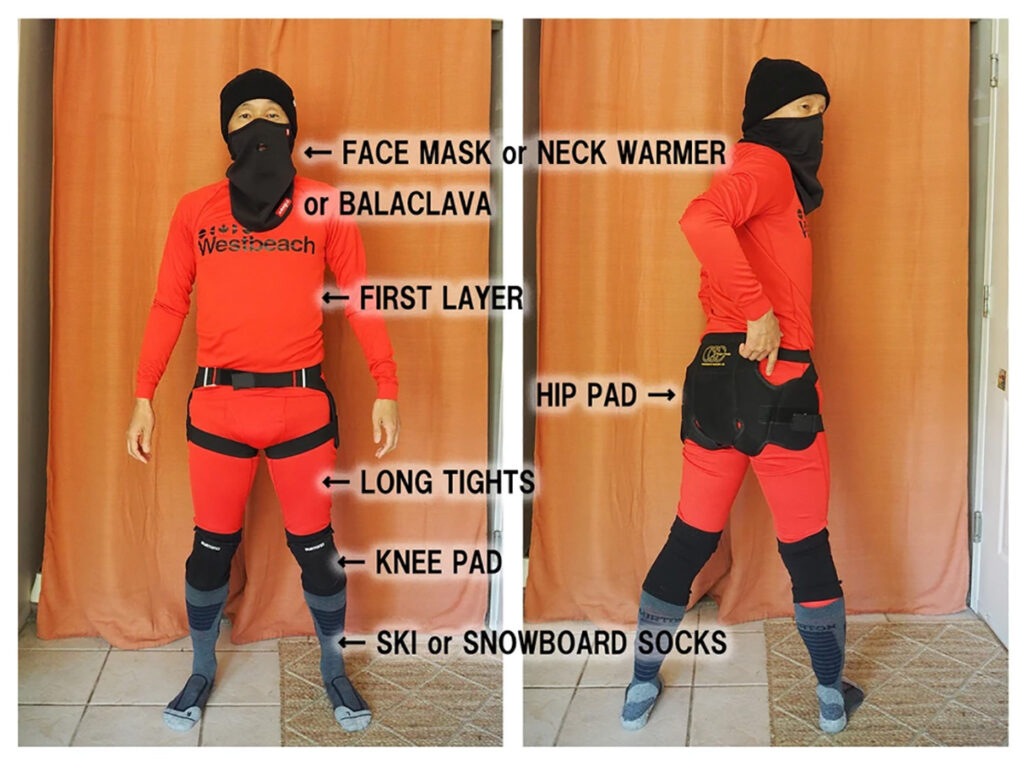
For the base layer, wear undershirts and under tights, this will give you more flexibility when you want to do carving turns. One of the first areas you feel cold when up on the mountains are your feet, so make sure you have proper socks that are meant for snowboarding / skiing. Merino wool socks are highly recommended for snowboarding.
For extra comfort and warmth, you can wear a fleece for the second layer.
Hip pads and knee pads are also helpful for beginners.
I recommend wearing such clothing and boots before you go to the ski resort.
Get used to the feeling of dressing up as a snowboarder.
Snowboard pants gaiters should cover outside
When you are wearing snowboard pants, don’t tuck the gaiter inside into your boots. Otherwise, it will feel uncomfortable and your boots can’t be nice and tight.
The boots gaiter should cover over the outside. If you wear it properly, snow will not come into your boots.

Tips 3 : One foot sliding(skating) on a flat
Before you start, make sure to find a nice flat surface, this way you can ensure that your snowboard won’t slide away. Once your front foot is strapped in and you move along with the snowboard on a nice flat area, this is what we call “skating”.
You need the skills of skating in order to ride a chairlift or to try and navigate flat terrain.
How to ride one footed on a snowboard
To start off you want to look in the direction of travel, just like driving a car or riding a bike.
Start with your foot behind the snowboard, as it keeps your body in line.
To try and maintain your balance, make sure to slightly lean forward, putting pressure on your front foot.
Once that feels good, you can start to glide, which is when we put our back foot right up against the back binding.
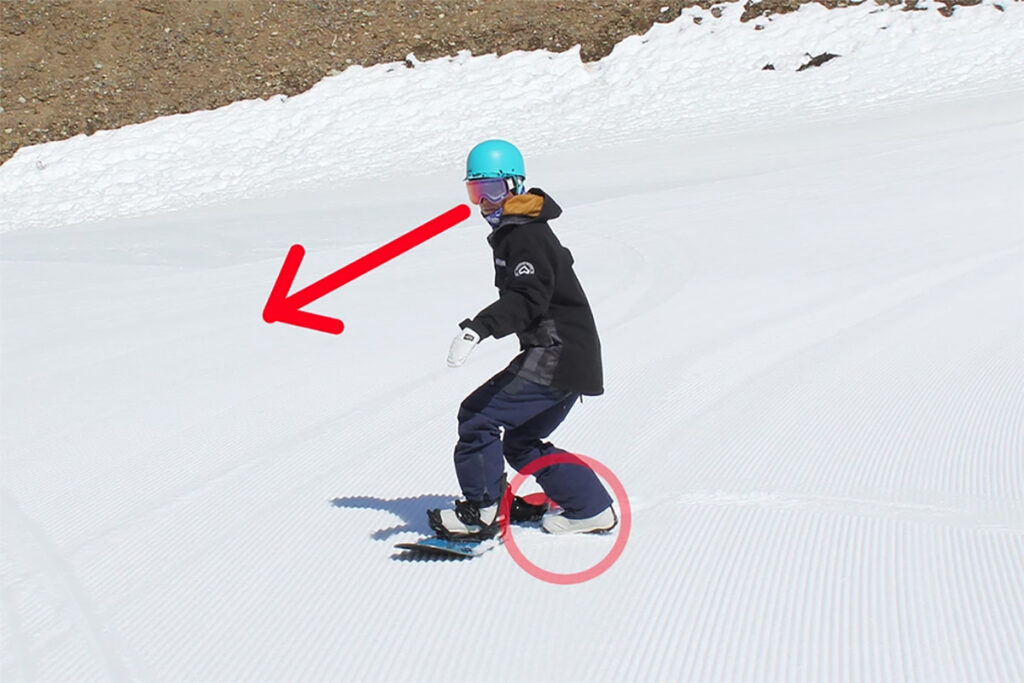
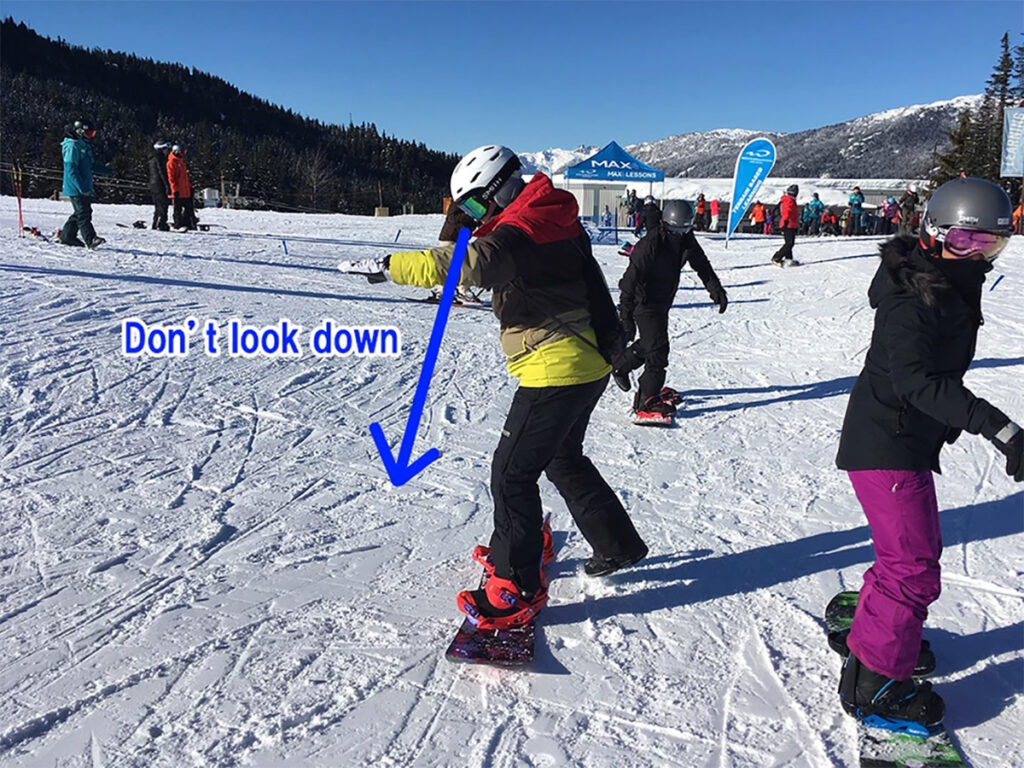
Try to make sure that your back foot doesn’t go too far past your back binding and don’t look down or else you might find yourself doing the splits.
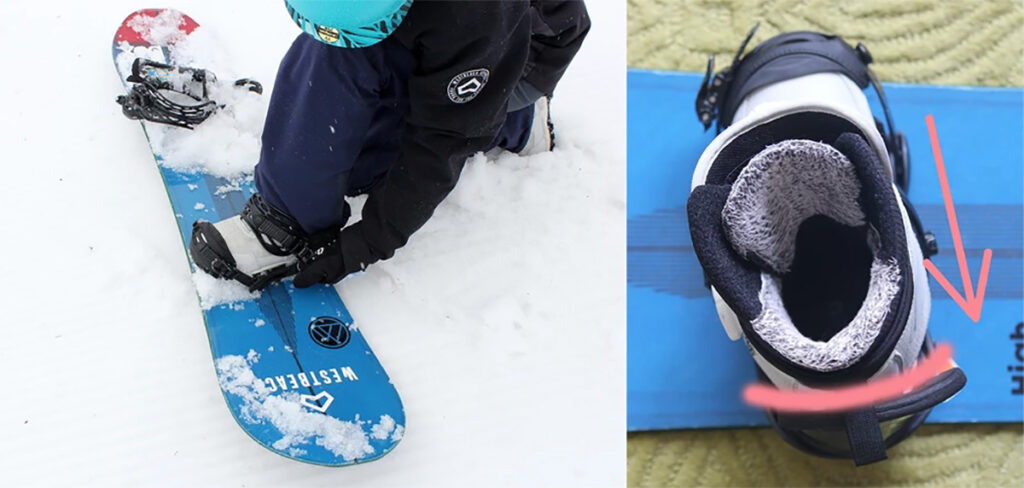
Make sure there are no gaps between your boots and your highback
I have taught many beginner lessons so far. When I am teaching I always say to “Make sure there are no gaps between your boots and your highback”.
If there is a gap, it will be difficult to snowboard. Be sure to tighten your bindings and no ensure no gaps between the boots and the highback.
Tips 4 : One foot sliding on gentle slope
Next step, let’s find a small slope, ideally ending with a long flat area, this way you don’t have to worry about stopping and excessive speed when you start to snowboard.
From the top of the slope, try doing straight lines down a small hill.
This is very important to practice, because the scariest part for beginner snowboarders is getting off the chair lift. If you practice this exercise, you’ll be able to ride and control your speed with just one foot strapped in while getting off the chairlift.
Let’s start practicing!
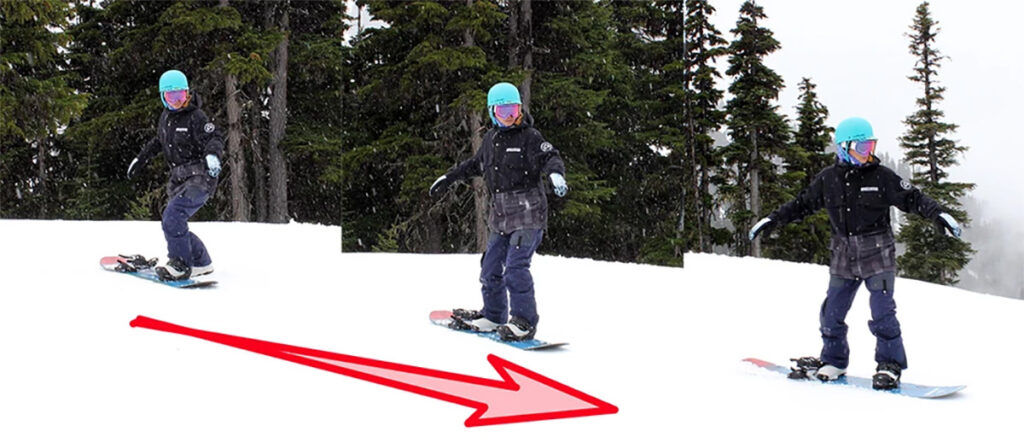
Make sure to keep your back foot planted in the snow until you’re ready to go. From there, pivot your board so the nose is pointing straight down the hill.
In one smooth movement take your free foot and place it on top of your board against the back binding and off you go.
Try to stand with your knees flexed, back straight, head up, and hands over the nose and tail of the snowboard.
Make sure to look where you’re going, and your board will usually go where your shoulders are leading.
One foot heel side turn
Next, try to turn on the heel side and stop.
To do this, you’ll need to tilt your hips and back right over the heel edge of the snowboard.
As you do that, you’re going to start to feel your calves hit the upper part of your back binding and feel some pressure in that area.
As you lean back, very gradually, you wanna keep your knees nice and bent and you’re gonna lift up the toe edge of the snowboard.
When you lift the toe edge of the board, you should be able to feel the top of your boot with your toes.
- Relax your body, then look in the direction you’re wanting to go. Make sure to keep your free foot planted in the snow until you’re ready to go.
- In one smooth movement, take your free foot and place it on top of your
board against the back binding and off you go. Keep your shoulders aligned with your snowboard to stay in a straight line. - Slowly shift your weight towards the heel feeling the pressure of the back binding against your calves and keep pushing down on your heels.
- In order to turn, make sure to lead with your shoulders, and in result, your snowboard will turn in the direction you’re wanting it to go. At the end, try to put more pressure on your back foot in order to stop.
One foot toe side turn
Now let’s try do a toe side turn followed by a stop.
Many people find the toe side more difficult than the heel side, so in order to make it as easy as possible, make sure to get the following points down.
1. Same with heel side, relax your body, then look in the direction you want to go.
2. Place your back foot on the board, then head down the hill with a nice even balanced stance.
3. Shift your weight towards that toe edge by bending your knees closer to the snow.
4. Keep your back nice and straight, turn your shoulders inwards, and bend the front ankle, it will let you come to a stop.
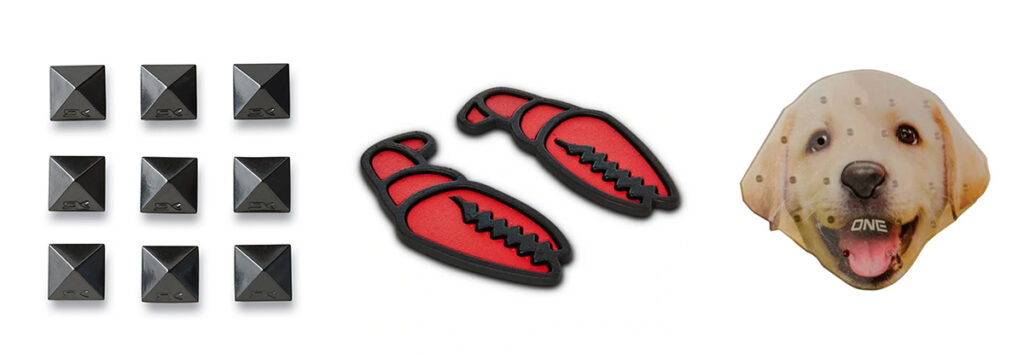
Let’s put a Stomp Pad on our snowboard
When practicing one foot sliding, I recommend you to put on a Stomp Pad.
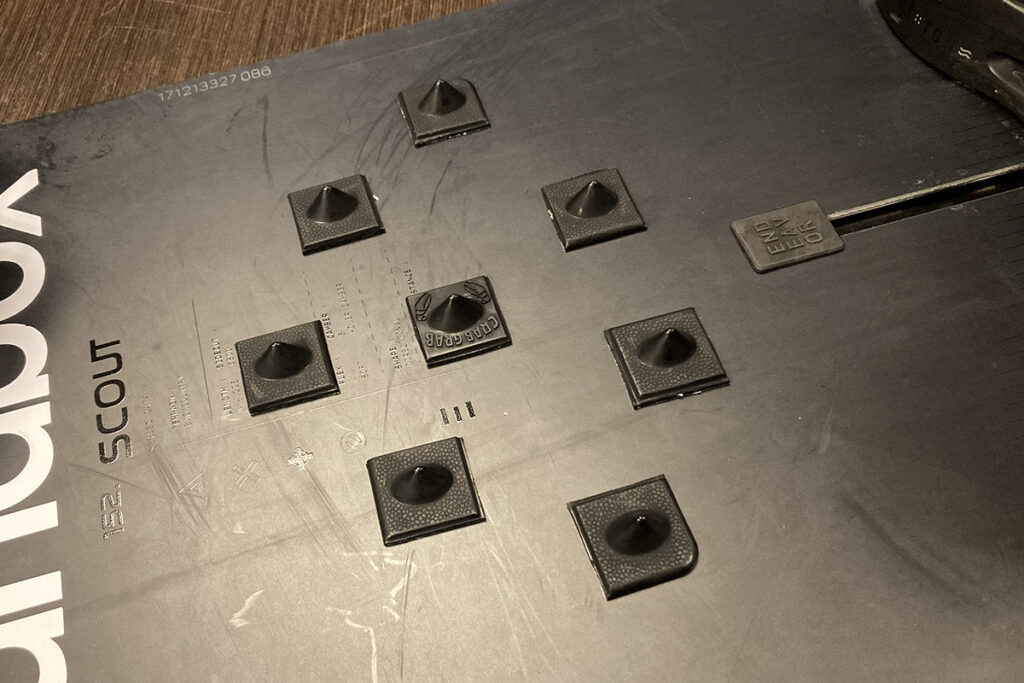
A stomp pad is a grippy non-slip surface that you put on your snowboard. It is an accessory to help you control your board when coming off the chairlift or for one-foot riding.
Stomp pads should be placed closer to the back foot than to the center of the board.
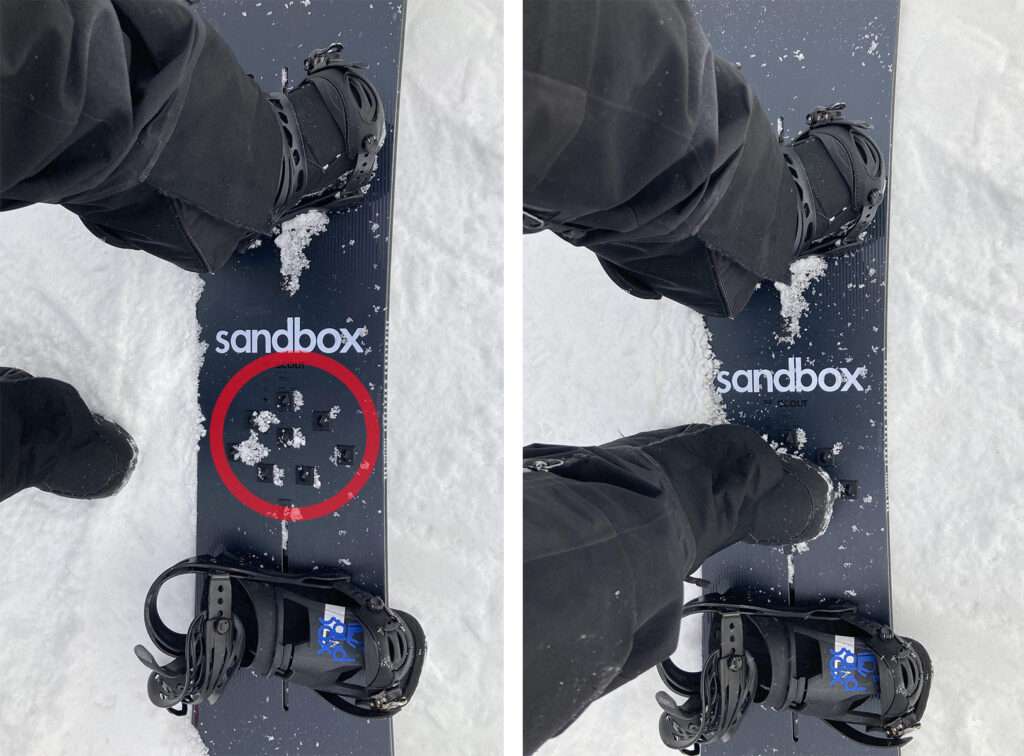
If you go to a snowboard shop, you can find Stomp Pads of various designs, but any will do. You can buy any one you like.
Tips 5 : How to get off a chairlift
Before getting on the chairlift, make sure to practice those one-foot pushes until you feel comfortable.
When you get off the chairlift, a common mistake, is to feel the need to stop right away. Instead, try gliding for a while to get out of the way of the people on the chairlift behind you.
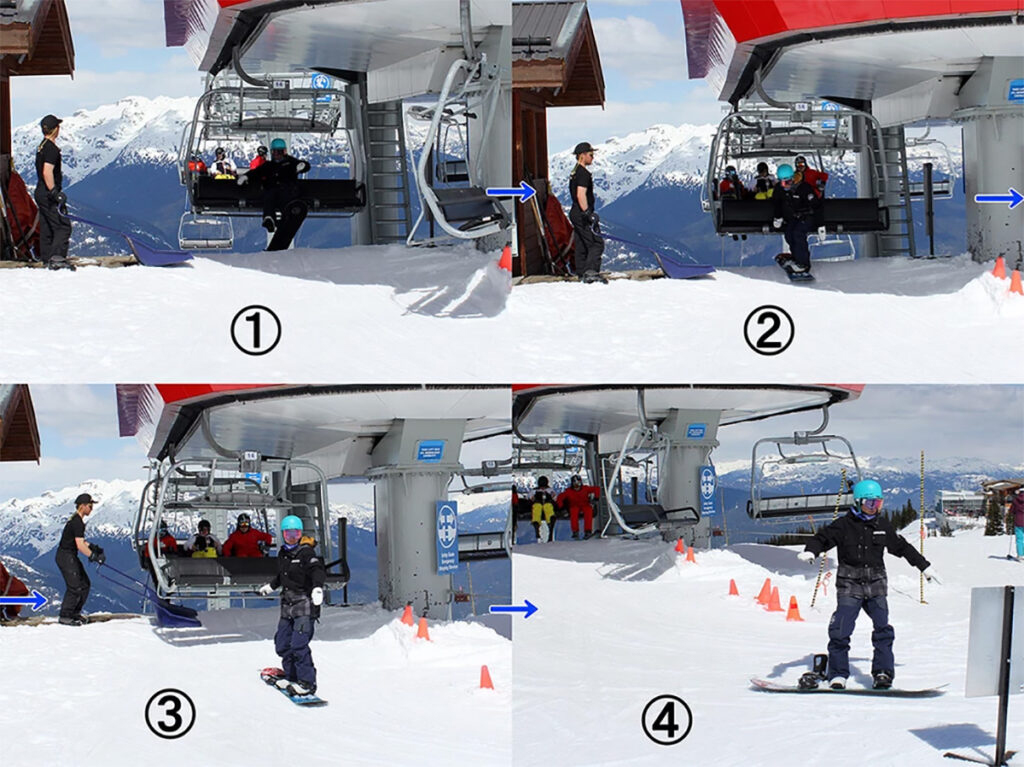
- Lift the safety bar up.
- Before you take off, please make sure to sit sideways so that your board is pointed straight in front of you. Stand up slowly until your snowboard can touch the ground.
- Relax your body, then look in the direction you’re wanting to go.
- You can stop on a flat surface, using either heel side or toe side. Move quickly so the people behind you don’t hit you.
Tips 6 : Side Slipping
For snowboarders, side slipping is an important technique for speed, control, and stopping. It’s a super easy way to slow down if you ever feel you’re going too fast. It can even help you come to a stop.
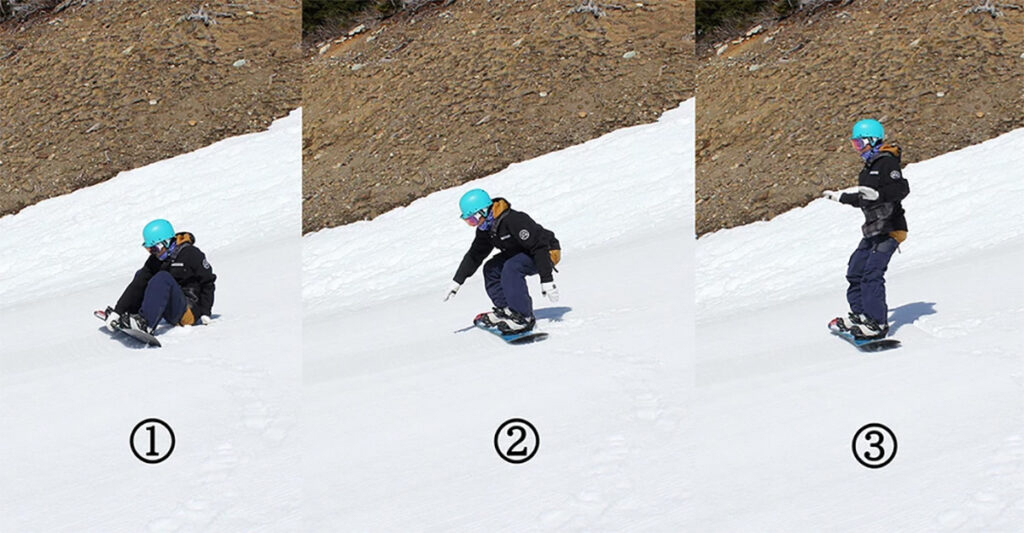
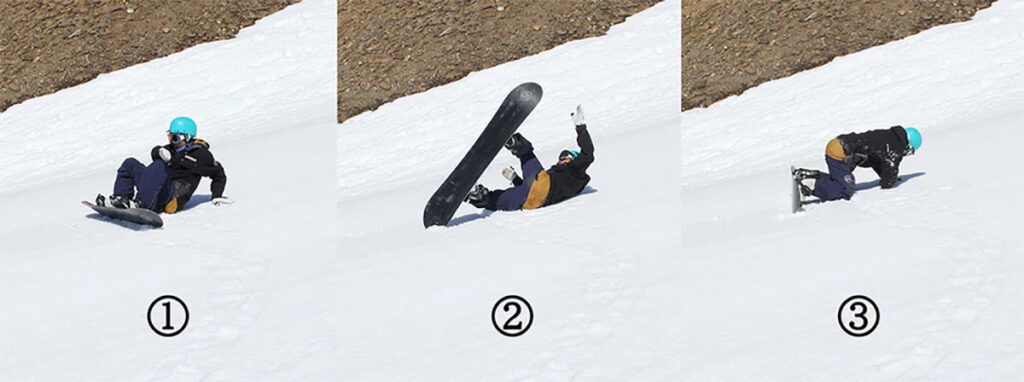
How to stand up on heel side
Getting up with both feet strapped in can be a challenge. As soon as you start pushing on the board to stand up it wants to slide out from underneath you.
You need to keep your toe edge nice and high to insure that you have a firm grip on the snow.
If you start to push your hips into the air first, it’s hard to keep that toe edge high, causing the board to slide out from underneath you.
Instead, scoot your butt close to your board and in one smooth movement push yourself upwards. If you want, you can even grab on to your toe edge with one hand to keep your weight forward.
Once you’re standing, your board is probably going to start moving right away, so be ready to side slip as soon as you stand.
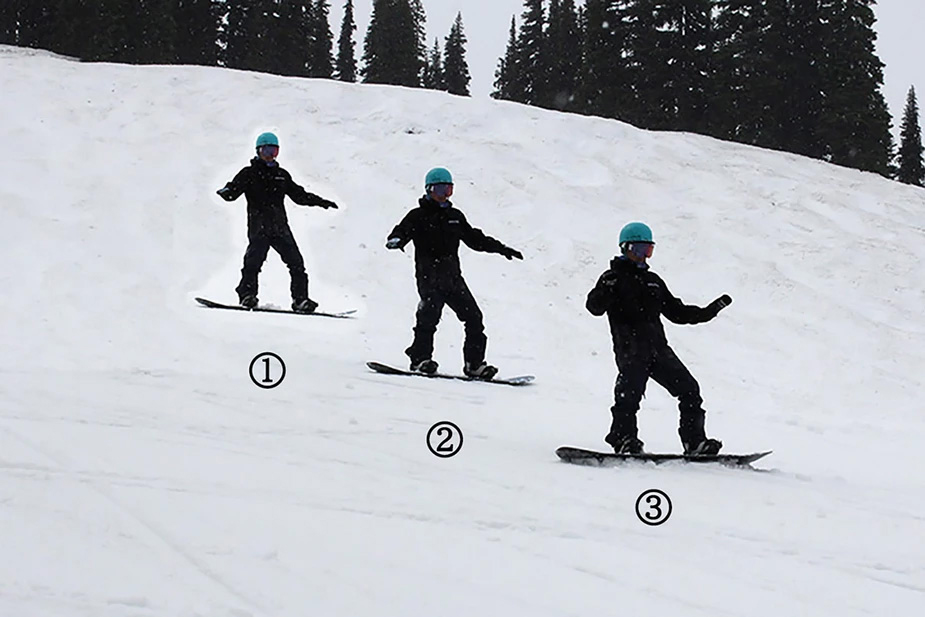
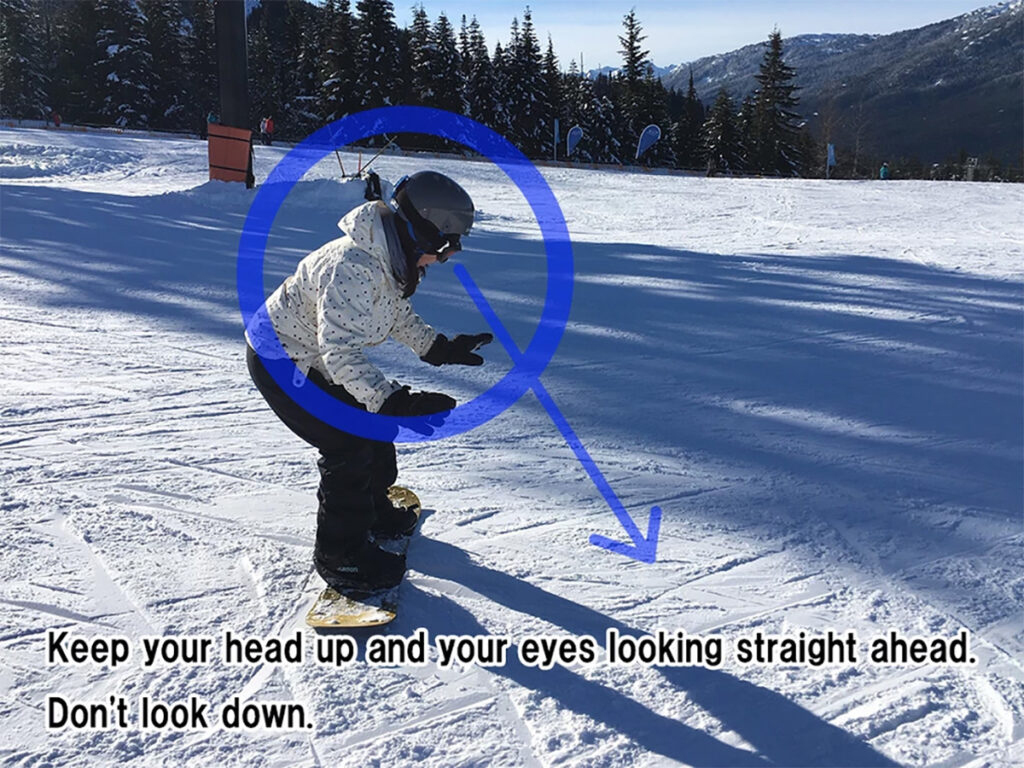
How to use heel side slipping
Keep your head up and your eyes looking straight ahead. Don’t look down.
Bend your knees and maintain a straight upper body.
Once you’re standing, push down gently on your toes to start moving. The toe edge of the snowboard should not be touching the snow sitll.
After this, your board should start to move so make sure to maintain even weight on both feet with your arms to the side for balance.
If you put more weight into your heels and increase the heel edge angle, you will be able to stop.
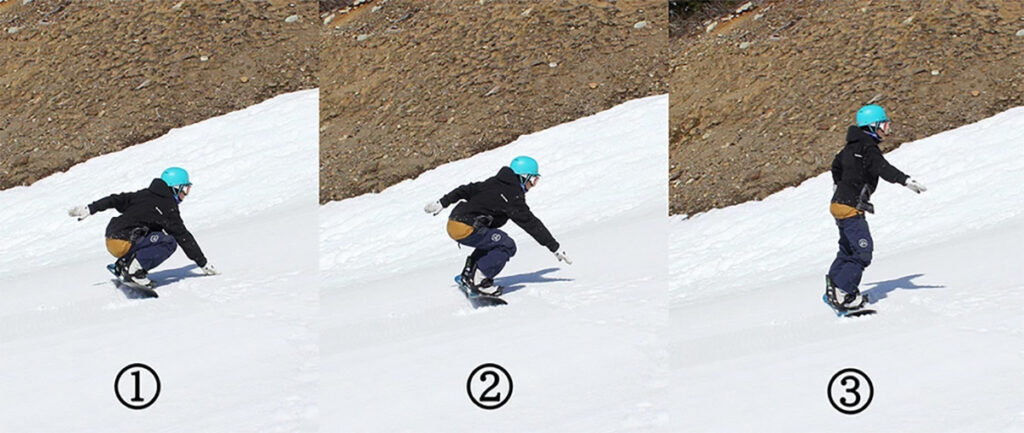
How to stand up on your toe side
Now I will show you how to stand up on toe side.
All you have to do is let your back touch the floor and lift the left or right leg up and pull yourself over onto your toe edge.
Then just stand up. This is much easier than the heel side.
For toe side please make sure your back is nice and straight.
I have seen lots of people in the past in a hunched back position. Good body position is a very important factor for improvement in snowboarding.
How to do toe side slipping
Make sure to keep your head up and look directly uphill. From there, bend your knees and maintain a straight upper body.
Once you’re standing, with your ankles slightly bent, stand up a little and relax the ankles a little. After this, your board should start to move.
Maintain even weight on both feet with your arms to the side for balance, and please make sure to straighten your back. Lots of people bend their back. This gives the rider no control because if your back is bent, your weight will not be over the toe edge of the snowboard.
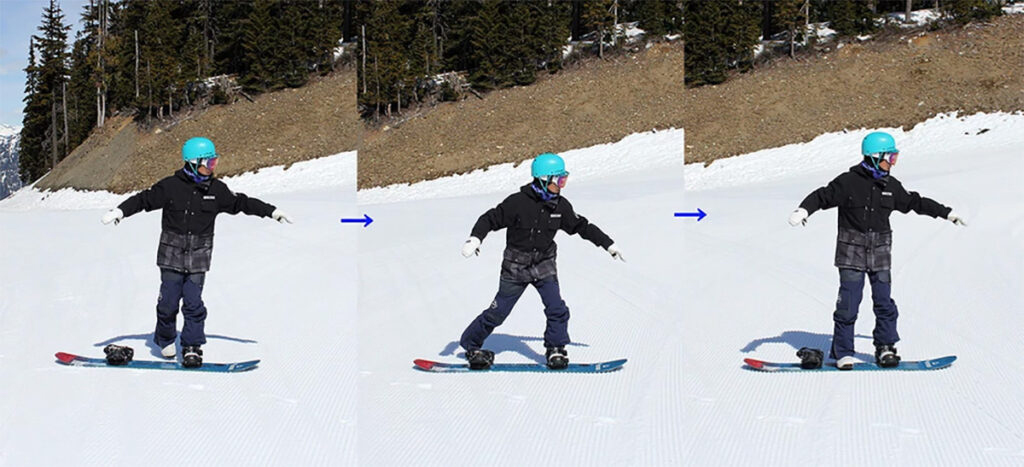
Tips 7 : Pendulum(zigzag riding)
Pendulum is a method in snowboarding of gliding left and right while controlling the speed. You can zigzag using one side of the edge.
This is an important part of turning, as it will help you move across slopes.
Heel side pendulum
Start this exercise by side slipping on your heel edge.
Bend the front ankle just like a step on the car accelerator.
Look in the direction you’re wanting to go.
Increase edge angle with even pressure on both feet to slow down and stop.
Toe side pendulum
Start this exercise by side slipping on your toe edge. Make sure to bend your knees and straighten your back. Relax the upper body and don’t tense up.
If you push down on your front foot, this will make you start sliding on your toe edge.
Increase edge angle with even pressure on both feet to slow down and stop. Don’t forget to look where you’re going.

Tips 8 : First turn(C turn)
Turning is the first step to becoming a intermediate snowboarder. If you can make turns, you will be able to ride more freely on the slopes.
Let’s begin!
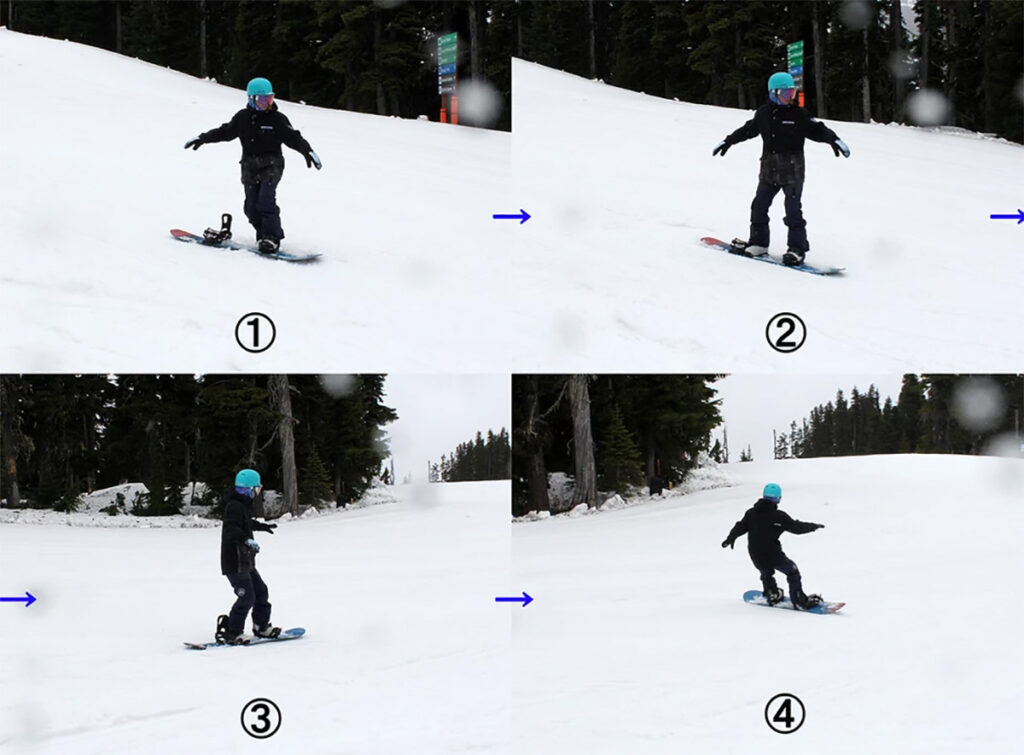
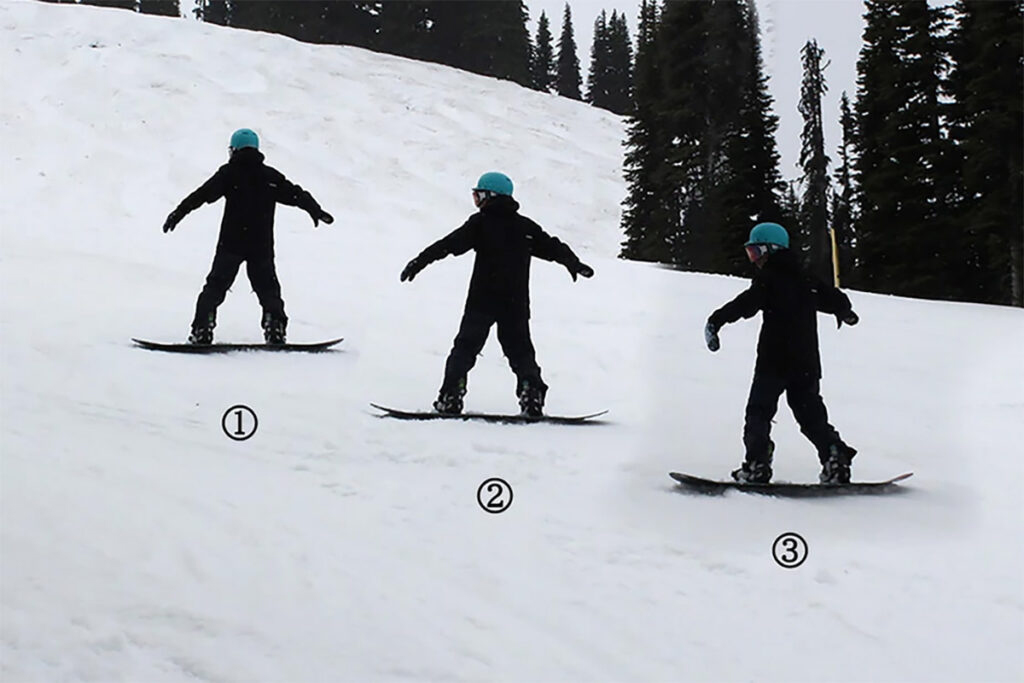
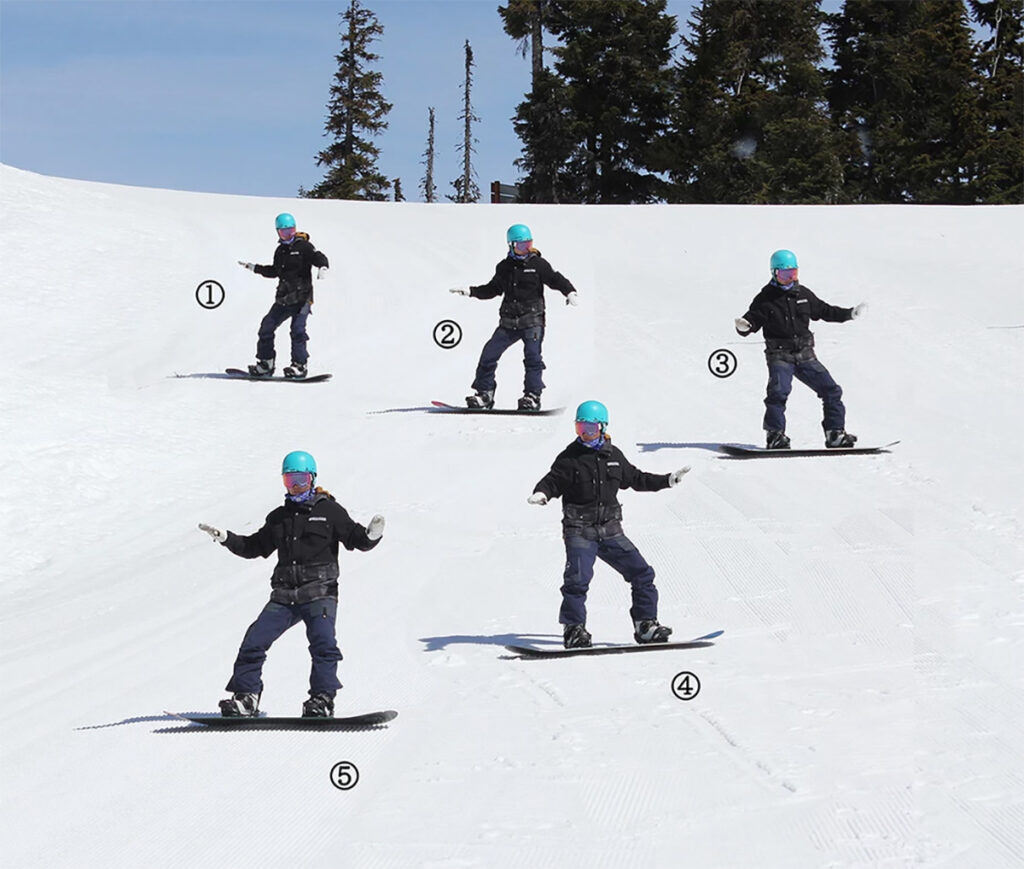
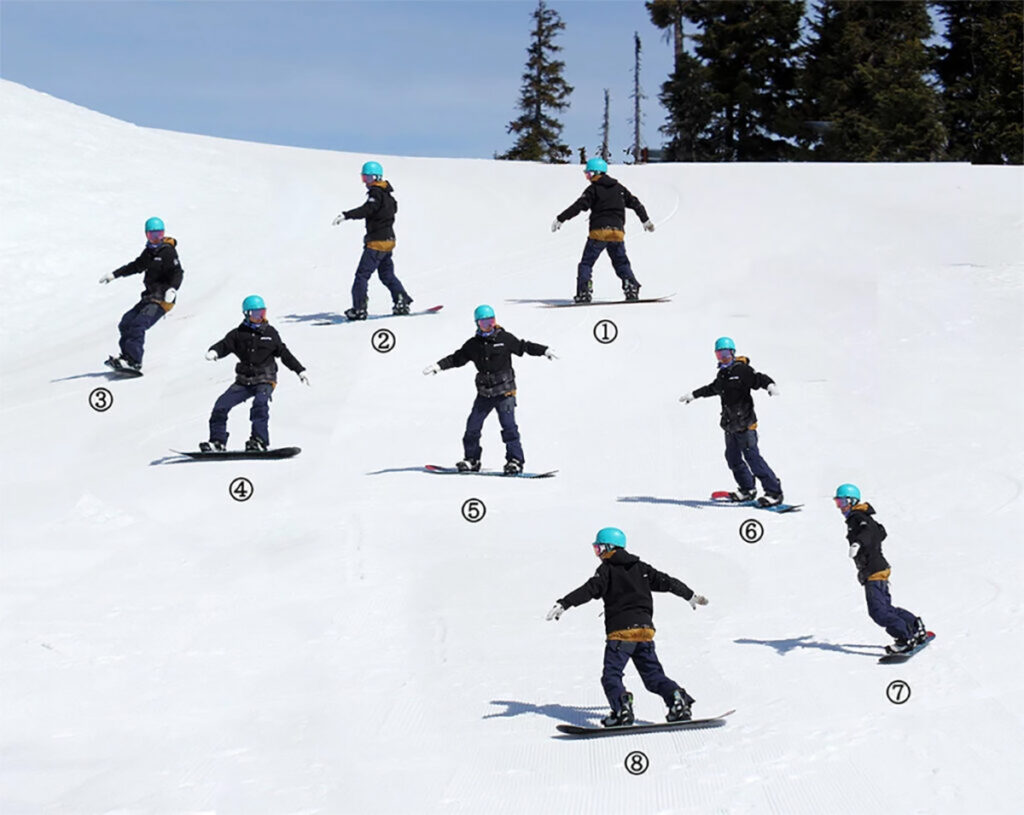
Heel Side Turn
The heel side turn is the most fundamental turn. Most say it’s easier than the toe side turn so it’s only fitting that we start here!
In the first step, you will need to be on your toe side and looking uphill. This step is vital in order to initiate a heel side turn.
When you’re ready, keep your head up and look in your riding direction.
Don’t look down at your feet. Look across the hill to where you are going! You can also direct yourself with your front hand. This will help keep your body weight centered.
The most important part is when you are going downhill which is step ② and ③ shown in the diagram above. Try to put your weight more onto your front foot.
Your board will begin to point straight down the hill. Engage your heels into the snow you can complete the heel side turn.
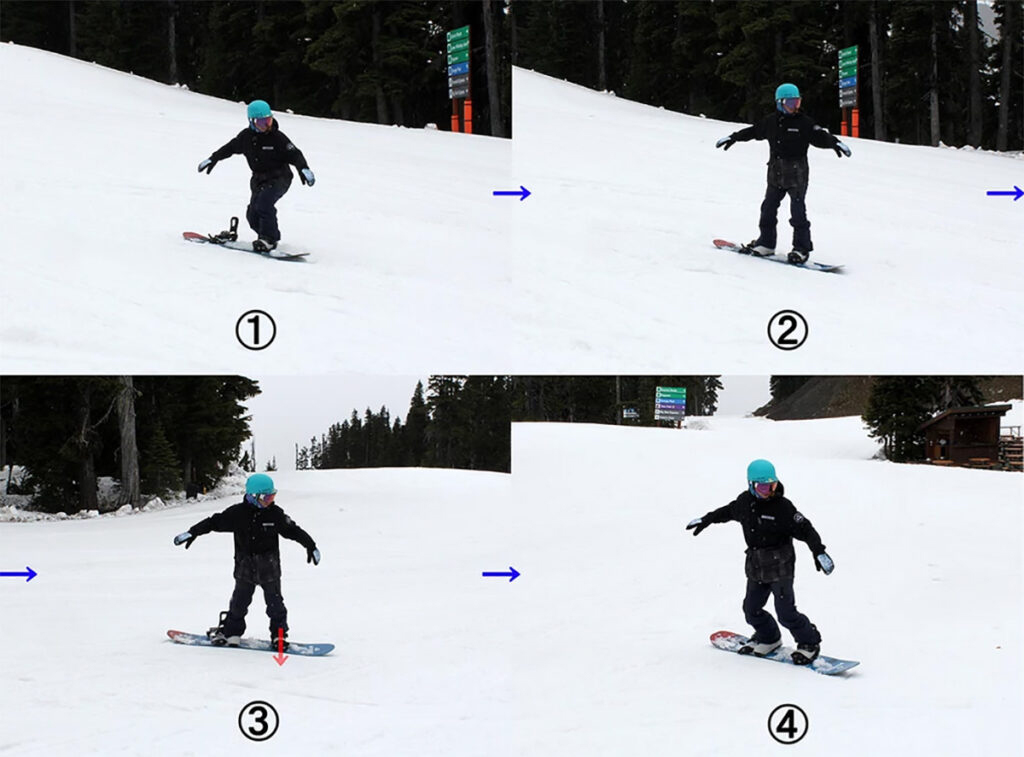
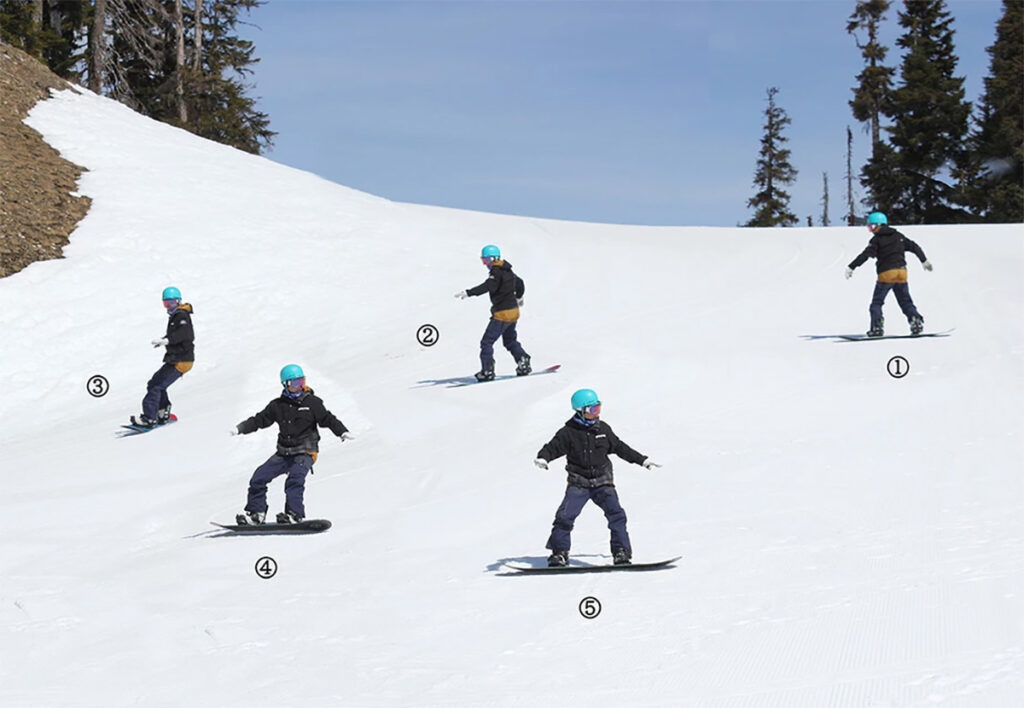
Toe Side Turn
Many people find the toe side turn much more challenging than the heel side turn.
In order to successfully make this turn, it is important to maintain the right toe side position.
If you are unsure of your toe side position, return to the previous exercise: toe side pendulum.
Start off with a heel side slip and make sure you have some speed to move side ways across the slope.(①→②)
This is important because it allows you to accumulate speed, and without speed, it’s difficult to get the chance to turn. The momentum is what helps you make the turn.
Bend the front ankle just like stepping on the car accelerator(②→③). Try to have more weight on the front foot. Keep looking across the hill to where you’re wanting to go, rotate the hips and knees, then your shoulder will follow.
This will help you change the edge from your heel to your toe.
At the end of the turn, make sure to balance your weight. Another key point is to keep your back straight, this is an easy aspect to forget as many people feel the need to lean with their upper body when they make their turns.
Please don’t forget that good body posture is crucial for improving in snowboarding.
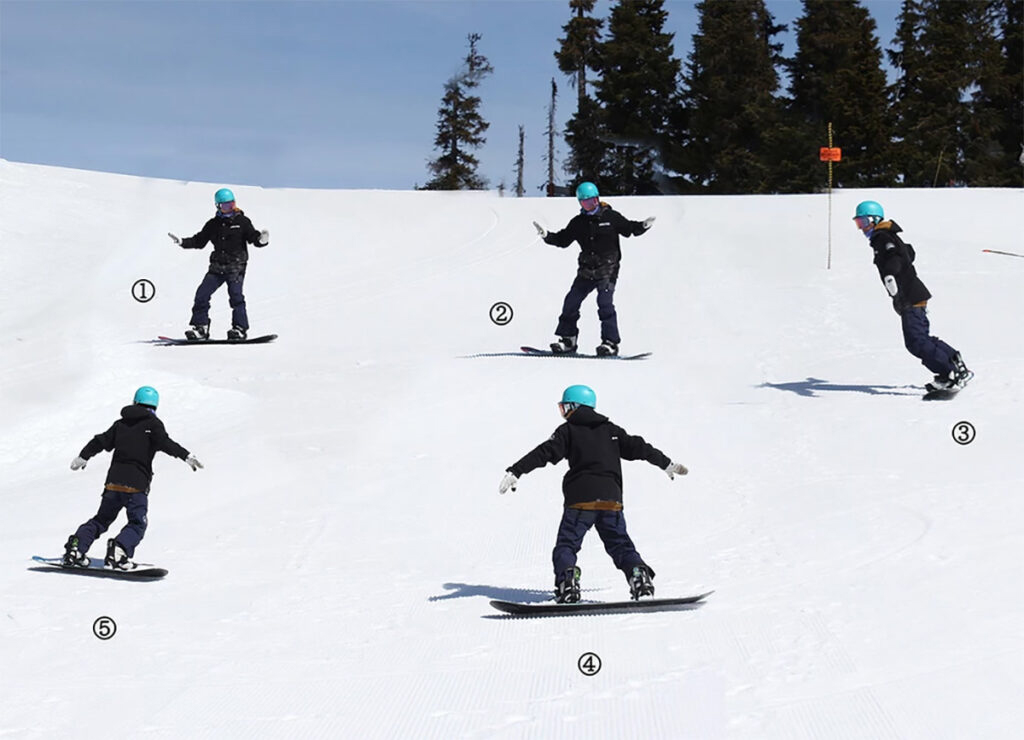
J-turn practice helps you linking your turns later on
Making a turn is difficult for those who are new to snowboarding.
Don’t be too hard on yourself if you can’t nail it right away, most people aren’t able to turn immediately and turning is one of those things that look so much easier than it actually is.
One of the reasons why most beginners cannot turn is because they’re afraid of pointing the board downhill and picking up too much speed.
Therefore, I recommend the J-turns exercise introduced here.
Even if you can’t point the board downhill towards the fall line, you’ll be able to gradually build up courage the more you practice and learn how to trust your edges.
This exercise can also gradually increase your edge techniques, making you more comfortable performing these tricks.

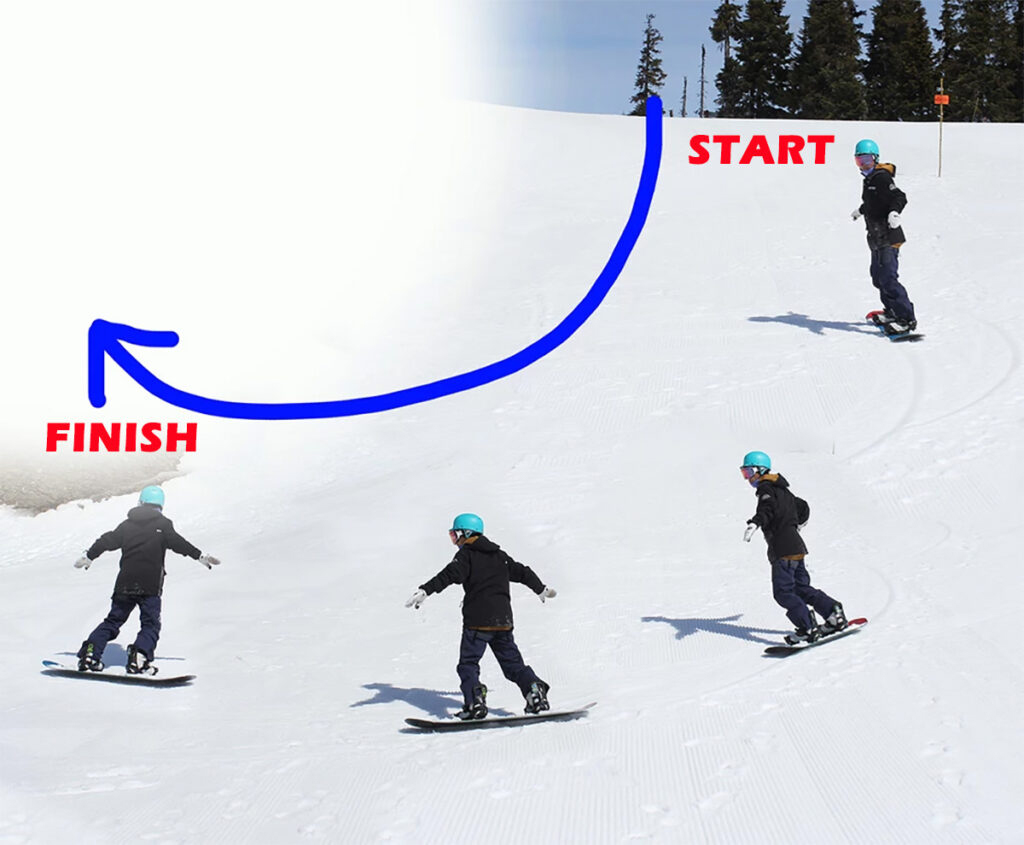
Tips 9 : Link turn(S turn)
For the final tips, I will be showing you how to link your turns. If you have been able to complete the previous heel side turn and toe side turn, this linked turn will be a breeze.
The link turn is just a combination of the two previous turns and will have you looking like a pro in no time!
Please try to imagine yourself by referring to the diagram shown below.
Good luck on your first day of snowboarding! Hopefully it help snowboard beginners!!
Key Points to Remember
- Relax and breathe. This is one of the most important steps as your body will not respond if you’re tense.
- Maintain good body posture and keep a straight back, this in return will improve your technique.
- Look where you’re going, you have eyes for a reason!
Must-Have Accessories: A Snowboarder’s Packing Checklist
When heading out to the slopes, you can often find snowboarding accessories for sale at local ski resorts. However, buying in advance not only saves money but also reduces the stress of last-minute shopping.
To help you get fully prepared for your snowboarding trip, here’s my suggested packing checklist of essential accessories. Be sure to have these items ready before you go!
Snowboarding Accessories Packing Checklist
- Goggles
Protect your eyes from snow glare and UV rays while ensuring clear visibility in various weather conditions. - Helmet
Safety first! A properly fitting helmet is essential for protecting your head on the slopes. - Gloves
Keep your hands warm and protected. Choose waterproof gloves for extra comfort in snowy conditions. - Protective Gear
Consider wrist guards, impact shorts, and back protectors to minimize injuries from falls. - Face Mask or Balaclava
Shield your face from cold winds and frostbite, especially in harsh weather. - Base Layer (First Layer)
Opt for moisture-wicking and thermal innerwear to stay warm and dry all day. - Cable Lock
Prevent snowboard theft by securing your gear with a lightweight but sturdy cable lock. - Snowboard-Specific Socks
Wear high-quality snowboard socks to avoid blisters and keep your feet comfortable in boots.
By packing these essentials, you’ll be well-prepared to enjoy your snowboarding adventure without any unnecessary worries. Have fun, stay safe, and hit the slopes in style!
Fusaki Iida Profile
@fusakidmk
Originally from Tokyo, Japan, Fusaki Iida is a highly experienced snowboard instructor based in Whistler, Canada. With over 40 seasons of snowboarding experience, he has spent decades sharing his expertise through articles, instructional videos, and books.
Fusaki has taught more than 12,000 snowboarders and continues to inspire riders of all levels through his lessons and leadership in one of Japan’s largest snowboard communities. His dedication to snowboarding earned him the MVP award for Whistler instructors in the 2016-17 season.
Passionate about helping others enjoy the sport, Fusaki is committed to making snowboarding accessible and fun for everyone.